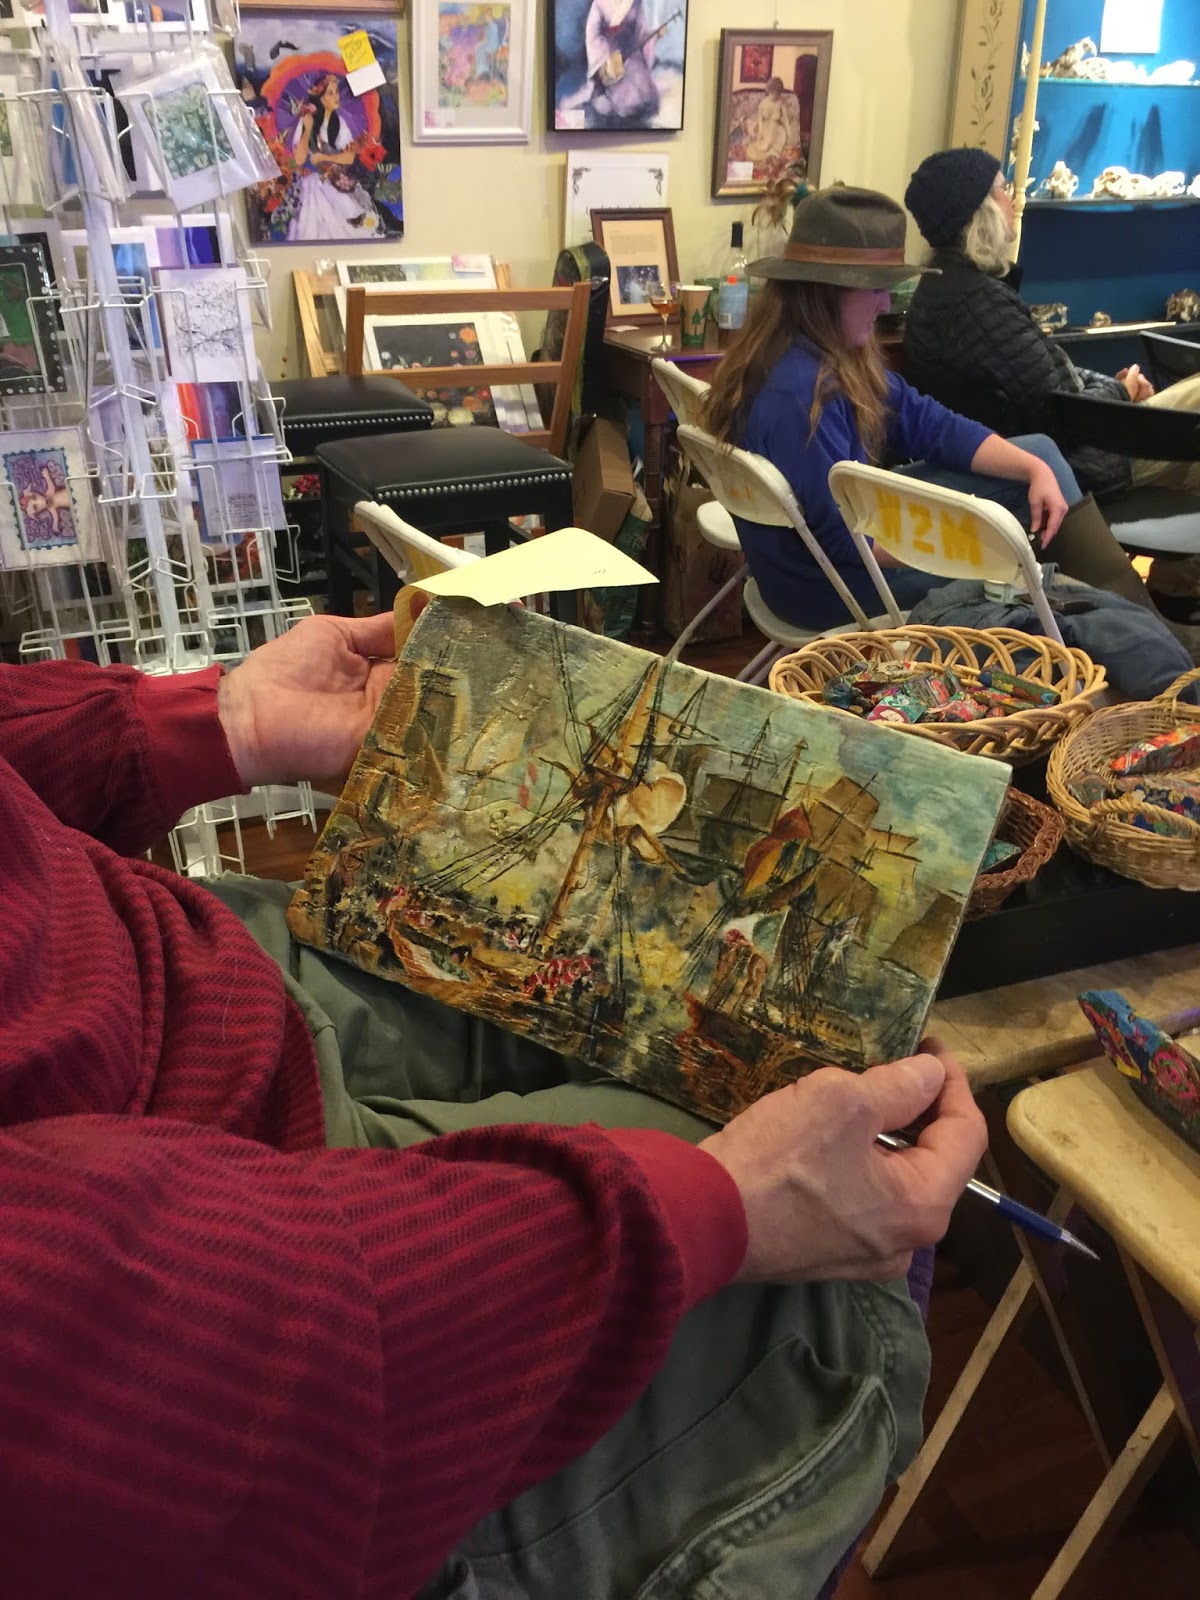
We are beginning to reconfigure this painting project by incorporating it with what we already do in our wood work through Marshall Arts. Thus, Jim will add a message to the oil paintings I completed in 2012 thanks to y'all and then I will add artwork as seen in 1st picture above.
We have processed and have 4 or 5 already ready to go, as can be seen here.
We did finish and sell our first one! At a great poetry/art event at local Artisun in Hot Springs.
Super grateful for all who have supported our art.
linking to paint party friday: am revisiting a cool epic painting project I undertook in 2012! Some of you might remember/have seen these before, but I just recently ran across this from the Google Play store! I suppose it's an ebook? Really fascinating, in any event! And it mega brought me back to when I myself was churning out JMW Turner oil reproductions on driftwood.
JMW Turner is one of the greatest artists Britain has ever produced. His watercolours, with their extraordinary effects of shifting light and dramatic skyscapes, are especially highly regarded. For the first time, the secrets of Turner’s technique are revealed, allowing present-day watercolourists to learn from his achievements.
This book combines unrivalled knowledge of Turner’s working methods from Tate curators and conservators with practical advice from some of the world’s most respected watercolour experts.
This book is for watercolourists, which is a medium I'm not as happy in as with oils, but certainly I am very interested in this book.
(Any watercolourists among you: would love to see what you thought of this book.)
I would especially be curious to speculate how my owm project would've developed if I'd had a book like this to guide me along during the sojourn. Even though oils are not watercolours I'm pretty sure I could have learned something.
In any event, I didn't seriously set out to reproduce, 100%, Turner's ouvre. If nothing else, the medium makes that task impossible.
For instance, Battle of Trafalgar is a painting that is taller and wider than me in real life! That in itself makes any attempt and desire at absolute reproduction impossible.
Battle of Trafalgar in process on old barn wood; Marshall, NC, 2012
As well, the wood itself, with its flaws, pockmarks, and texture, added something to the work that Turner's did not have. That would be my contribution to the piece.
The obvious third reason is my skill level clearly is not the same as the old master's. Try as I might, clearly I do not have his genius, but neither did I have his timeframe.
A Country Blacksmith disputing upon the Price of Iron on panel in progress (underpainting), Marshall NC 2012
As stated before, the purpose of the Kickstarter project (seen here) was to recreate, one per day, a Turner piece onto a piece of wood. For me, artistically, fabricating one of these per day was an exciting technical as well as creative challenge. Some of the pieces were no big deal to pull off in a few hours; whereas others took like 12+ hours to finish. Some, in which i had to use layering techniques, were only possible to complete over 5+ day time - what I would do in this case is have 5 simultaneously in production, and work them all every day so that at the end of the 5 day period (if I wanted 5 layers) I would be finished with 5.
In general am very pleased with the result, and am happy with the artistic outcome that the raw wood and the frenetic pace allowed me to capture of Turner's work, without, clearly, having the collection be anything like a perfect replica of Turner's work. I am glad to have been able to put some of my own artistic process and limitations into these wonderful, epic pieces.
In any event, I will get the book, and see if I do anything interesting with it.
I made this video a couple of weeks ago to encapsulate a bit, and summarize as best I could, the experiences I have had in creating not just this ultimate Turner reproduction, but the entire project as a whole.
Needless to say, it was very encouraging and nice viewing all that wonderful old footage, and it reminded us of the great and wonderful times that we had in the past making lovely art. Definitely in many ways, "those were the days".
I was happy to see how easy the YouTube video editor has proven to be. Since losing out on almost all the technical and computer equipment I used to have at my disposal to create videos - for instance, the original Epic Painting Project video from 2011 - I had to scramble around for a few days looking for the best, quickest-to-learn, and inevitably affordable option. When I had pretty much discarded all my options, and was feeling somewhat desperate, I somehow miraculously found the youtube video editor that can be found here.
It's pretty shocking how time-consuming creating a video is. I would say, not counting actually searching for raw materials, the 13-minute piece took easily 20 hours - considering I didn't even need to worry about talking heads/audio, it is an amazing time sink.
I had recorded a small talking head piece, but it ended up being rubbish - bad audio and incoherent to boot - so it seemed vastly better to me to do it the way I did.
In any event, it seems like a lovely project with which to mark a finale for this exciting time in my life.
In any event, I just wanted to post a few final pics of the thing, some close ups, that sort of thing
Last thing I will do is hopefully before the 25th a nice edited video showing how it all came to be. Nothing Oscar-winning, but something incorporating the footage I already have.
Not that I would turn down an Oscar, necessarily.
And so it ends, the project I will always fondly remember as the one I undertook with a broken leg!
object size (coffee on hand)
light conditions were weird that day, all the clouds made the colour be crazy
I have finally uploaded the short videos I shot during the prepping and painting process of my most recent project! The piece itself is finished, and just awaiting drying time to arrive at its final destination. I was very sorry to see the project end! And only wish that more wood & Turner aficionados roamed the earth so that I could never stop having these paintings to work on.
At first I was using what I thought was a legit Blogger feature (uploading videos) but quickly folks informed me that no video showed up, but only a still. So I decided to just wait till I had a moment to upload stuff on YOuTube then put the links in that way.
But I ended up having bizarre trouble uploading the videos onto YouTube, for the simple reason that the last time I uploaded videos on YouTube was in the dinosaur days in which you had to upload the video onto some video editing software, then convert it with some 3rd party software (we used 5 square), then upload it on the site. The alternate has been to have a mobile device to shoot the video, then upload it that way, but it always made my device crash and take years.
Finally I decided to just Google if a way existed to upload videos from Google + to YOuTube - and it was the easiest bloody thing on earth! So I went, did that - it took all of 35 minutes, and now it's done.
First video is from 3 years ago, from when Jimbo worked on the piece of wood and explained his method, rationale, etc.
Second video is of a random painting process, once again from the last time I worked on this project in 2012:
This third video is the initial wood prep for this particular project, the fire of the house of commons:
This one was taken July 24th, 20 minutes before I broke my leg - an experience that tainted my summer as can well be imagined:
This other one is a video I shot after gessoing the wood and discussing materials:
This video goes into a colour choosing protocol I sometimes use when I paint (I was not in a great mood this time because my leg was giving me trouble):
This one is the one where I finally paint!
and last but not least, here is a completely gratuitous video of Jim's hair being blown about by a fan. His hair is sculpture in its own right
Well on my way to finishing, I present some images from recent progress:
As can be seen, all the image of the main image has been laid out in white. Now is just a matter of laying out the rest of the groundwork, and finishing the edges.
I also have a few photos and videos of process:
Painting setup. Due to leg injury am forced to paint on couch with leg raised
Swatch studies, so that I can both pick paints I want, and see how new combinations look.
video explaining swatch process
Now that i have begun the painting process in earnest, the fun time has begun! All the preparation has led to this moment. It is a fairly quick process, if I have the chance to just sit down and paint, from here to termination. I have picked the shapes of the holes to inform how the composition will go, using the natural holes in the wood to represent where holes, dark areas, or tunnels were in the composition. Also the lines have been matched up to where horizon lines or the limits on the Bridge. In any event, I am very happy to have gotten this far, in spite of all weird obstacles. Am also adding a few other photos for a blog post I neglected to write a few days ago, re. actual preparation of the wood.
I have done one coloured study, and it ended up taking a long while, because I possibly spent an two hours or more per layer. Halfway through this I was like "is this really necessary?" but by then I was fully committed and couldn't turn back.
So I am sharing all the layers, same pencils, etc. This is a throwback to a printmaking technique that I learned in college called lithography:
under this process, a person can create a complex composition by adding the colours in layers. IE first the yellow, then you ink the stone with that colour and run it through the paper, and wash, rinse, repeat for every colour, manipulating the stone so that the proper things are highlighted. The trick is to match the paper so that it all fits together. I am doing a crappy job of describing it, but what I'm basically doing is doing it a colour at a time, with the watercolour pencils, and having it all add up.
Yellow
Orange
Pink before watercolour
Pink after Watercolour
Red before Watercolour
Red after Watercolour
Brown
Green
Blue + touchups (E brown, black, etc)
Overall pretty satisfied with how it came out- some thigs I am unhappy about insofar as tonalities, but these problems would be resolved with oils because this medium of just using like 7 or 8 colours only has its limits
Still stumbling under a bum leg, but have reason to be optimistic. I see the doctor tomorrow who will have more to say about this. I believe it's healing well.
Jim went ahead and prepared the wood for painting - first he has sanded it, first by using the coarse sandpaper, then the light grade sandpaper, all the way to the lightest sandpaper.
More on this video here:
The next part of the journey is, how to edit the painting to account for the canvas size? I will on facebook her put forth 2 options, one is to just edit out the sky and put as much of the action as I can, and another option is to just make a smaller canvas so that the entire picture will fit?
This is the question I sought to answer next, by taking the wood, the original painting, and through PHotoshop, trying out different layout scenarios
Here is the first, straightforward one:
Simply to reduce the size of the painting so that most of it would fit onto the canvas, leaving large portions of the bare wood visible. If I were to go on this option, I probably would not have such a stark edge, but more or less have it be softer or more blended or at least more round
The second option is to try to fit more of the dramatic scenery into the canvas, which would mean eliminating some of the information, in this case, the sky so that the drama of the crowds watching takes precedence:
As can be noticed, my demos take the hole of the wood into account. I have to say here that even though I like the fact that there's more painting space and thus more details for the audience (and that's where Turner himself was at one point; at the beginning of the fire he and some art students rented out boats and were out there in the thick of it, sketching, then, when the roof of the building collapsed, everyone inexplicably laughed), I miss the dramatic, awesome sky and am not crazy re how the composition holds up.
The third version also removed information, but this time favouring the sky:
I actually like how this one looks the best, though Jim and others have noted how eliminating the drama of the onlookers is a big mistake.
The fourth version is based on #1, but involves making the decision to artificially extend the entire painting to fit through all the edges:
The advantage is it keeps everything in there - the sky, the audience - and it also makes use of the entire piece of wood. The painted version would obviously look a lot slicker than this quick Photoshop mock-up, but the basic idea is I would extend the sky and the bridge to the right, and the audience to the left. One disadvantage, aside from making stuff up, is that the exposition area is still small. This seems to me a visually more appealing option that just the small square though, or of leaving a lot of wood. Note again where the hole lies.
The fifth version is actually my favourite version - it actually uses the sky version (#3) which was my favourite one due to how much I liked the dramatic sky:
Here I made the #3 option, but extending the bridge as in the previous version, but also expanding the left side, and actually choosing to put all the boat people/rubberneckers/sketchers to the left hand side. In other words, I am redoing the composition, reinventing history, if you will.
I think it looks the best. I will look for feedback from others, either online or in the real world, but I'm pretty sure I will choose to do it this way.
Here are simply some progress sketches of the last black and white sketch
as seen, first just the outline across the board is laid out, and then the most dramatic scene to me (the place where the flame is consuming London and sending dark stuff through the ether - early on I realized in this sketch that for some reason I cropped like an inch off the left - so I had to just go with it
The second sketch begins adding more details on the boat and in the castle - also some of the people at the end are being added
in this one I'm adding more of the people on the lower left, adding details and darkness/contrast overall to the river and to the boats in the centre - I think here's where I began with an error in the castle area - in all my sketches so far I have had trouble calibrating elements in the castle
here we see more details emerging throughout the picture, more darks & lights, etc - also the error along the castle (I keep calling it a castle but it's really the parliament building) became solidified, so I had to simply go with it, once again. This is after all the sketching phase. Also finished the people on the right.
This is technically finished, but I am not liking how there are parts of it that are too stark, so I added graphite and blended in the smoke cloud.
Overall not happy with the dark of the sky but I think it's still an improvement over the 2nd sketch I did where I overdid everything
this is how far I will take it now. As I said, the left inch is gone, the sky is to heavy, and obviously I didn't finish the right edge in a finished way, and also the Parliament needs to be improved, but as I said I feel like this is as far as it needs to go
For contrast, I am posting the previous sketch to compare:
It only took me 2 weeks to put up a new sketch! Here it is, it is more black & white
the interesting thing about thsi sketch is that it is way too dark for the simple reason that I am utilizing a medium I am very unfamiliar with: watercolour pencil. I'm not that great with watercolour, period, and I used too much pigment. I mean, I was trying to go for more contrast than I did in the other sketch, but went way the other way. Also fudged the proportions a bit, but thats what this process is for. to get all the bad ideas out of the way!
One reason for my delay in painting is purely practical: I am still needing to find my art supplies from the time of the fire. After we signed the lease thru March on our new dwelling, we have had to spend an inordinate amount of time dealing with our stuff in storage, and the main issue has been, where are my paints? I have basically $1,000 worth of art supplies (esp. for oil and wood prep) in the storage unit, and I've been waiting to find them. Meanwhile I purchased these nice pencils.
The next step in terms of art process is to add colour. THat's what we use the pencils for as well. I am to make one or two more black and white, one or 2 more colour, and by then I trust we will have moved on to the 3rd step which will be painting on the wood panel itself. Jim prep process will be part of that as well as, most importantly, finding the paints.
By then the sketching will have taken me to the place I want to be, which is similar to the place that a musician or an actor wants to be when they are finally at curtain time, after having rehearsed for ages. I come from a primarily musical background, transitioning towards art in high school. What I have gotten from the musical process is a multi sketch method whereby I rehearse in advance what I want to lay out - different ideas, different force, different perspectives, or proportions, even, and then the final result is supposed to be the best characterization of all those things.
which of these boxes contains my paints?
The storage business gives me a reason to be forced to stay away from painting so soon.
THe summer allows for sketching in nature, suck as this video indicates:
This other video, taken near the Pigeon River in a lovely watering hole, shows Jim's wood gathering process, something else that occurs on these walks, making them both a huge part of myTurner art process and the Marshll Arts process I had described in the past.
Sadly, not all works out so well, and yesterday, this happened at most an hour after the above reasonably happy videos:
As can be seen from the above videos, the place is lovely but there's lots of room for error. In ten years running around through the Western North Carolina woods, this is the first time this happens to me. I fell bizarrely as I was hopping from rock to rock and slipped on one that was more wet than it appeared.
So if this post sounds disjointed and weird, it is because I am suffering physically and to an extent mentally due to the lack of caffeine since I hear that helps the fractured bone process.
Not for that do I believe that the painting project is compromised - blessedly it is a small canvas.